Monday, December 13, 2010

I have a logo for my project

Finally, the table has been brought home late at night.

The next morning I heard the tiny feet of my older daughter (5 years old) going to the living room, and then a 5 seconds pause, immediately after that she came to our room running saying that the game table is here.

My younger son, well, he gazed at the table didn't know what this new peace of furniture is until I opened the joystick panel, he simply came running pressing all buttons moving the joystick and looking all around.

That day my older daughter went to kindergarten and came back with a drawing of the table. She was so excited (so was I) that she gave it to me with a kiss as a thank you for the table.

I returned the favor and placed her picture as the boot screen LOGO of the table.
What is written above the drawing of the table is her name "Karen" in Arabic letters.

My wife gave her input on the table and indicated that it is a little bit dangerous and not tidy enough inside. Our son could try to touch something from the inside and will probably not end well.

I heeded her warning and acted accordingly.

I bought a long wire which is actually a spring covered with white plastic, a net used for keeping pests outside the house, used for windows and doors and hooks for use with the spring.

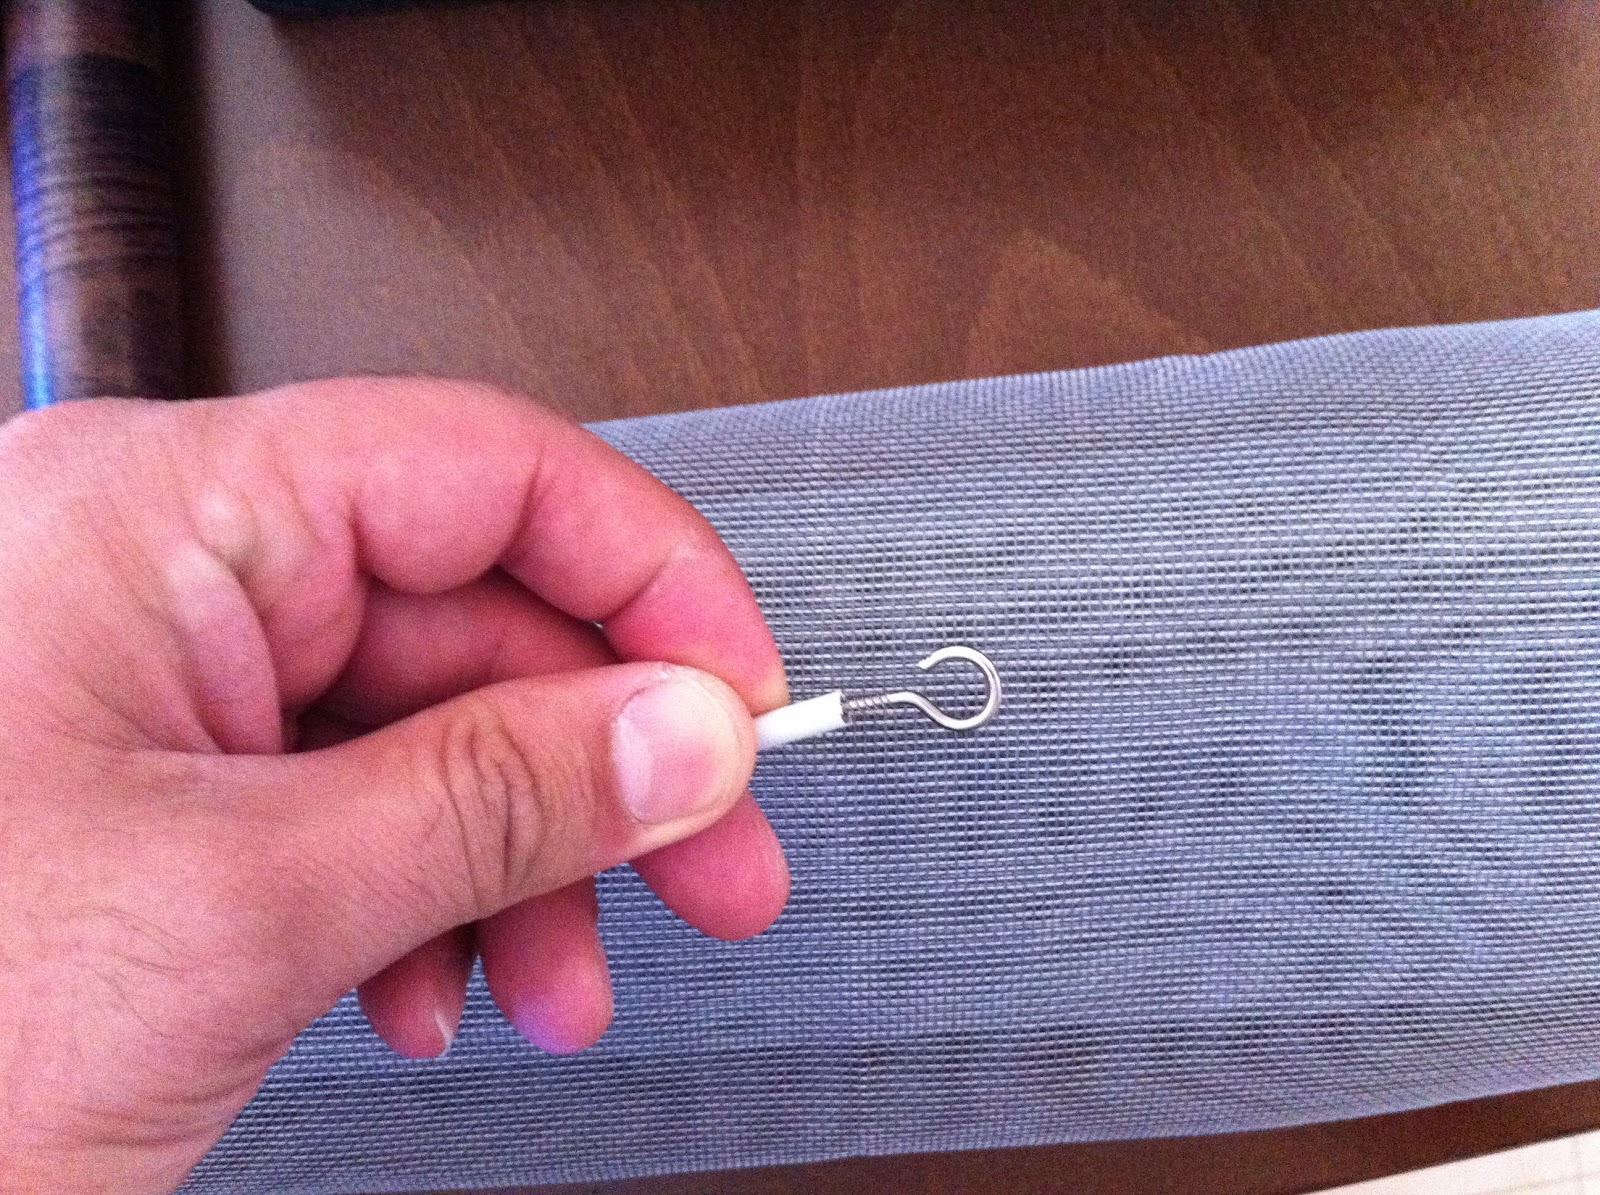
I used these material in the middle of the table to create a cage like fence for the dangerous parts and a brier for the rest so that the table will be tidy and nice.

Well, if I'm already starting to work on the table again from the inside to make it nicer, why not use the cover-up paper I bought to cover the table from the inside to make it look nice. I did just that. You can notice the cover-up paper just behind my hand in the above picture.

Final results:

Just a reminder on how it used to look before:

The table is a success. We play with it every day, my wife and daughter love it. My yonder child (the 2 year old) loves to play with the key (each control panel door has a lock), he keeps opening the control panel, turning the table on, watching the intro movie and then he keeps going into a game and leaving a game. He's still young, but he can keep doing this for hours. At leas now I know the machine is robust :).

So what's next in my posts:
  • I hope to compile a video showing off the table
  • A few words on the Solid State hard-drive I used
  • A comprehensive post of software configuration and resources you probably should know if you ever build your own Arcade Machine.

Sunday, November 28, 2010

Working on the WOW effect


I have finished installing Mame Plus! and Mala and also placed a few ROM images to test with.

I would like to show some of the tweaks I did for the table. These tweaks were done earlier before even starting the painting process of the table.

USB ports
The Arcade table is a computer as you all know, and I will probably want to change the games that it provides, for example remove games that we don't play and add new ones. To do this, I will need to transfer the games to the hard-drive. The USB ports are the most elegant way to transfer data, but opening the table and connecting one from the inside is not that comfortable.

I bought from eBay 5 USB ports that can be placed in a cabinet. They are connectors that have a round body with a square face and have a female USB A socket on one end and a female USB B socket on the other.
You may find this on the net by searching for the keyword NAUSB.

I placed two USB ports in the table and connected them to the mother board.

Power plug
To make the table much more comfortable and give it more WAFE, I took a power socket filter from an old network switch and used it in the table. This way I can unplug the cable, and the table won't have any noticeable sockets and cables.

Following is the bottom of the table:

On the left you can see the two USB sockets and of the right, the power filter socket.

Following is a top opened view of the table:
Notice that I connected a 25-pin female plug to the I-PAC on each side for each joystick panel. This allowed me to build the table and connect the parts easily, and also will probably come in handy when something breaks and require fixing.

I'm planning on finishing the software part this week. My wife is exited about the table, and to make her even happier I will probably install the classic PAC-MAN for her. She loves PAC-MAN. She used to be very good at it.

What I still need to complete:

  1. Configure the I-PAC (or software) for the EXIT game button to function
  2. Make the MALA interface look nice and pretty ;)
  3. Tweak the windows to load without any noticeable messages to make the table look authentic.

Saturday, November 20, 2010

Almost there!

I'm almost done! I can't believe it myself, but I finally finished the joysticks along with the wiring, placed them in the table and secured everything. I event did a minor test, and everything seems to function. Here is a picture of the 1st Player control panel:
The 1st Player control panel comes also with two side buttons for powering on the machine (located on the left side of the panel - illuminated in green) and the exit game button (located on the right side - illuminated red)
The 2nd Player control panel was colored red with a blue joystick.

This is how the joysticks were placed in the table:
To secure the Joystick control panels, I had to use something that will allow me to later disconnect the panel for repairs or if I find out in the last minute that I did a mistake.
For securing the control panels I used a window latch that I found at a hardware shop. I used two on each inside side of each panel. A picture is worth a thousand words:

When the table is closed, everything is snagged in nicely and comfortably. First I made sure that the control panels doors can be closed and that the spacing that I did was correct.

Then I placed the monitor and connected all the wires/connectors. I took a picture from the point of view of the 1st Player control panel:

I did another test before turning on the machine if everything is sitting properly and the panels can be closed and opened:

And the final test is to check if the buttons work and I didn't miss anything. I did a basic test and then my wife called back home to help her with the kids. The only thing I did test was the power on button that function correctly and all the lights in the table work just fine. I did a small test with the joystick going up and down, but not much. I'll do the thorough test later this week.

The next day I went into the workshop and just looked at the table and took a deep breath. It's amazing how I see the end of the project arriving.

I asked my wife to take a peek. She looked at it and she gave me a kiss. She was very impressed with the results, when she knew with what I started. She even asked questions later on how will two players play if the screen orientation can be adjusted to only one player. It seems that my wife is interested to see it in the house, and I think I'm raising the WAF scale here!

More to come soon, I should be receiving the glass top anytime this week.

Monday, November 8, 2010

Target: Before Christmas

I have completed the painting of the table and have the joystick panels ready and almost completely painted

A few mistakes that I made that I will have to live with. Glue must be sanded properly or the paint color won't get deep into the wood and will show on the final table. It also depends on which coloring material you use, and I chose to use the staining kind.

You can notice on the right side of the table just when the side wood is joined with the table's leg that the coloring there is poor.

I did the final gloss finishing on the table and it gave it a nice glassy like finish.

I'm happy with the result and the WAF scale did not pass the fail marker yet. My wife's comment and I quote: "It's not so bad, actually it looks ok, I guess".
I think that there is a good chance we will be enjoying this table on Christmas :).

I colored the control panels, and they didn't turn out the way I imagined, but still, I'm pleased with the results.

Coloring is messy, I'm glad I'm almost done with it. I only need to paint the other joystick panel with one more color coat and I'm done.

What's next?

  1. Put on the second door lock (I did one for the first door)
  2. Attach the panels to the table
  3. Get a glass topping
  4. Final finishing touches
  5. And the last and easy part: Software :)
I hope to be able to work on it this weekend.


Tuesday, October 5, 2010

Final adjustments to the design

After having many doubts on the coloring of the table and how it will look nice with the final finishing touches, I have my final design Sketchup here.

Following is a picture of the final table (for now :))

I colored the controls panel with contrasting colors of the other side joystick. The joystick colors I chose for the final design are Red and Green.

I took the advice of a friend of mine's spouse and will color the table in brown or dark brown and hope it will earn extra points in the WAF scale.

Those who do not know what is a WAF scale, read the following WIKI page.

As you may notice, the glass is not on top of the table but rather aligned with top of the tables legs and side frame. This is friends idea that will make the table much more appealing and easy to accomplish. The other options I had were nice but were either hard to make or not strong enough in certain situations and/or mostly not child proofed.

I haven't painted anything for now, I just sanded the whole table and closed some cracks and holes. I did some staging on a peace of wood to make sure I know how to paint this table and not ruin it.

If I won't succeed in making this table look good using paint, I'll always have the option of covering it with cover-up paper wallpaper or something similar.

If I manage to find the best way to color the table, it will probably take me two days to finish the coloring.

The next step is to get a glass topping for the table, but that I will leave it to the very end. I need to get accurate measuring so that the glass will fit in perfectly.

Tuesday, September 28, 2010

Let there be light

Time for the whole box to get some electron flow going through its vanes.

I didn't like the fact that the LCD monitor had an external power supply. Looking at the external power supply, you will notice that the power output of the LCD power supply, provides 12V output with 4.16A.

So I though, let's try using the computer power supply. This way, the monitor and whole box will turn off the second the motherboard shuts off the power supply.

I cut off one of the connectors and just to be sure the wires will hold 4.16A I decide to be safe than sorry and use two yellow lines with two black lines.

OK, enough, I need to turn this whole machine on and see how it looks. For this I called my first born Karen to demonstrate.


Now comes the hardest part - Coloring the table. I need to chose colors and also do a very good job in coloring it.

Sunday, September 26, 2010

Controls Panel

Time to build the controls panel. I started with a paper template of the joystick and buttons layout that I got from http://www.slagcoin.com/joystick/layout.html. From there I downloaded the panel I wanted and printed it.

I placed the printout on the controls panel wood plaque and secured it with a staples using a staple gun. After that I started drilling into the wood.

I also added two buttons on left upper corner and right upper corner of the panel for Player 1 Start and Credits button respectively.

I also added two buttons on the sides of the panel, one of the left and one on the right for Power On and Exit Game illuminated buttons. The Power On button color is green and the Exit Game button color is red. I then wired the buttons with the ground wire and power for the illumination.
For the power socket, I used an extender power cable which I cut of one of the sides and connected the Red wire (5V) and black (Ground) to the LED connectors of the illuminated buttons.

I had to test the illumination of the buttons before continuing so, here are the results

 All looks good.
Now for the rest of the wiring of the controls panel. I used CAT-5 cables colored red and green. I used two different colors so I will be able to connect them to the other end easily and find which wire goes to which connector on the I-PAC board.
You can also notice that I added two neon lights on the back of the LCD monitor. I'm sure I will keep them, I managed to find a rather neat led strip in HomeCenter that should do a fine job. I haven't decide what to do with it yet, but I'm sure it will handy later on in the project.

Next, I need to connect everything and fire up the machine and see how it looks.

Do not underestimate the power of the glue

I have decided in the last few weeks to stablize the table by using wood glue. I wasn't sure if the glue is strong, but as it turns out the glue was amazingly strong. The table is now steady as a rock. I also added corner supports to make it more stronger and steadier.

On the sides I added small wood sticks to hold a 20cm width plaque of wood. This plaque of wood will hold the LCD screen. At first I wanted to hold the LCD screen only, later it almost has everything on it. The LCD screens come with a back is ready for wall mounting with four screws for securing it. So I went to a screw shop, showed him the screws I had and asked for longer ones, and mounted the LCD on the plaque of wood. The tricky part was measuring the screws locations on the plaque of wood, after all, they are not located in the center of the screen.
I added on the back of the plaque of wood the motherboard and the I-PAC board and connected everything together while keeping everything tidy and nice. The bunch of cables on the left side of the plaque is the VGA cable. It was too long, so  I wrapped it around the wood.

The hard drive that I used was a Compact Flash memory card with a SATA adapter. I placed it on the other side of the plaque on top of the LCD screen.
Here is how it looks from inside the cabinet. Plenty of space left and I have all the equipment mounted.
Next step is mounting the power supply of the screen.

Monday, September 13, 2010

Woodworking for the first time

Wood, tools and peace of paper with the table breakout. This is what I needed to start working on the arcade coffee table.

To start, I need to start marking the wood legs and the wood pieces that need to be joined with dowels.

After the markings I used a tool that was bought from Joint Genie called the JOBBER for creating dowel joints. It did a fine work as you can see in the following picture. You can also notice the tool.
The result of the joining of the wood was prefect and flushed.

After a little more than 2 hours of work, I managed to finish the outer frame of the table and I took a picture of it with my daughter standing inside it. The first thing my daughter said when she saw the table, that the table needs to be colored and if she can do it. I'll probably have to let her color something, but I know how it will turn out :).

I still don't have another picture, but I also have the bottom of the table screwed and secured.

Wednesday, September 8, 2010

Parents

Parents have a very important role in our lives. You all know this, but most importantly, you can ask them to use their large place (since all the kids left it, so plenty of empty rooms :)) for creating the project.

My mother agreed to this venture and I even got all the stuff there today.

Today was also a very productive day. I needed to get the wood for the table, so I went to an old (yes, very old) carpenter, which we hired once for a small job at the house, and I asked him for the wood parts. He turned me down. After all, it's not worth his time, or he didn't want to work on it. Still, it was worth the drive, he gave me a name of a wood supplier in Haifa that he might be able to help me. So I got into the car and drove there.

Indeed, he was a wood supplier, but most importantly, he provides even small amount of custom wood cuts. I came prepared with my measurements and asked him for the wood cuts.

Now I have all the wood cuts I need for creating the table, well, except for minor ones that require final measurements.

The cost? No more than 95$ for the whole table. Keep in mind I will need paint and a glass top so I'm not done yet spending money :).

I took the parts to my parents house and strait to the basement. There I had a very old table I once designed that was my work bench.

I'm now almost ready, and I hope tomorrow I will have some free time to go over to my parents house and start building the table. I estimate the building of the table in no more than 3 hours.

Oh, and by the way, the wood parts alone are rather heavy, so I agree with my wife, it will be a problem to use the table as a replacement table for the coffee table we already have in the TV section of the house.