Tuesday, September 28, 2010
Let there be light
I didn't like the fact that the LCD monitor had an external power supply. Looking at the external power supply, you will notice that the power output of the LCD power supply, provides 12V output with 4.16A.
So I though, let's try using the computer power supply. This way, the monitor and whole box will turn off the second the motherboard shuts off the power supply.
I cut off one of the connectors and just to be sure the wires will hold 4.16A I decide to be safe than sorry and use two yellow lines with two black lines.
OK, enough, I need to turn this whole machine on and see how it looks. For this I called my first born Karen to demonstrate.
Now comes the hardest part - Coloring the table. I need to chose colors and also do a very good job in coloring it.
Sunday, September 26, 2010
Controls Panel
I placed the printout on the controls panel wood plaque and secured it with a staples using a staple gun. After that I started drilling into the wood.
I also added two buttons on left upper corner and right upper corner of the panel for Player 1 Start and Credits button respectively.
I also added two buttons on the sides of the panel, one of the left and one on the right for Power On and Exit Game illuminated buttons. The Power On button color is green and the Exit Game button color is red. I then wired the buttons with the ground wire and power for the illumination.
For the power socket, I used an extender power cable which I cut of one of the sides and connected the Red wire (5V) and black (Ground) to the LED connectors of the illuminated buttons.
I had to test the illumination of the buttons before continuing so, here are the results
All looks good.
Now for the rest of the wiring of the controls panel. I used CAT-5 cables colored red and green. I used two different colors so I will be able to connect them to the other end easily and find which wire goes to which connector on the I-PAC board.
You can also notice that I added two neon lights on the back of the LCD monitor. I'm sure I will keep them, I managed to find a rather neat led strip in HomeCenter that should do a fine job. I haven't decide what to do with it yet, but I'm sure it will handy later on in the project.
Next, I need to connect everything and fire up the machine and see how it looks.
Do not underestimate the power of the glue
I added on the back of the plaque of wood the motherboard and the I-PAC board and connected everything together while keeping everything tidy and nice. The bunch of cables on the left side of the plaque is the VGA cable. It was too long, so I wrapped it around the wood.
The hard drive that I used was a Compact Flash memory card with a SATA adapter. I placed it on the other side of the plaque on top of the LCD screen.
Here is how it looks from inside the cabinet. Plenty of space left and I have all the equipment mounted.
Next step is mounting the power supply of the screen.
Monday, September 13, 2010
Woodworking for the first time
To start, I need to start marking the wood legs and the wood pieces that need to be joined with dowels.
After the markings I used a tool that was bought from Joint Genie called the JOBBER for creating dowel joints. It did a fine work as you can see in the following picture. You can also notice the tool.
After a little more than 2 hours of work, I managed to finish the outer frame of the table and I took a picture of it with my daughter standing inside it. The first thing my daughter said when she saw the table, that the table needs to be colored and if she can do it. I'll probably have to let her color something, but I know how it will turn out :).
I still don't have another picture, but I also have the bottom of the table screwed and secured.
Wednesday, September 8, 2010
Parents
My mother agreed to this venture and I even got all the stuff there today.
Today was also a very productive day. I needed to get the wood for the table, so I went to an old (yes, very old) carpenter, which we hired once for a small job at the house, and I asked him for the wood parts. He turned me down. After all, it's not worth his time, or he didn't want to work on it. Still, it was worth the drive, he gave me a name of a wood supplier in Haifa that he might be able to help me. So I got into the car and drove there.
Now I have all the wood cuts I need for creating the table, well, except for minor ones that require final measurements.
The cost? No more than 95$ for the whole table. Keep in mind I will need paint and a glass top so I'm not done yet spending money :).
I took the parts to my parents house and strait to the basement. There I had a very old table I once designed that was my work bench.
I'm now almost ready, and I hope tomorrow I will have some free time to go over to my parents house and start building the table. I estimate the building of the table in no more than 3 hours.
Oh, and by the way, the wood parts alone are rather heavy, so I agree with my wife, it will be a problem to use the table as a replacement table for the coffee table we already have in the TV section of the house.
Friday, September 3, 2010
Do we have an agreement?
My wife is having second thoughts about the table and she even mentioned that I may want to take it to my work place and place it there where I can show-off my project to my friends at work. This is her way of saying: "I've changed my mind, I'm not sure I want it".
I understand her, after all the only problem with the table is that it will be heavy and we need a table that can be moved around several times a day.
We'll see what happens, I'm still going to build it and bring it home, from there we will see where it lands.
For now, I want to share the latest design of the table. I colored each side of the table with a color of the joysticks I bought (red, green, yellow and blue).
You can see that the color of the whole panel for player one is red. You should be able to notice the second player panel which is yellow.I also placed the design for it in the download page, but you can also click here.
The second player panel has been colored yellow in respect to the typical second player joystick color which is yellow.I also have created a decomposition of the table and measured the parts to have them prepared by a carpenter.
I decided to take no favors (at the end I will require some :) ) and go with the measures to Home-Center (it's an Israeli version of the Home-Depot) and talk to the carpenter there.
I was out of luck, the carpenter has just resigned, so no help there until they hire a new carpenter.
Luckily, my brother in law (which I truly think is a very talented person - but alas won't have the time to share my project) has a relative whose hobby is carpentry. He gave me his phone number, and I will give him a call soon and let him on the project to understand if I'm missing anything.
It seems that I will not have much time this week to meet him, we are preparing for my second child's birthday (he will be two years old) and won't have any spare time to meet the guy, so I guess it's off for next week.
Thursday, September 2, 2010
Wood work is fun
When the table is used for games, the front cover will be opened and the control panel will be pulled out as a drawer. on the right side you should notice a red button. This button will be illuminated. There is also another green button on the left side.Monday, August 16, 2010
Missing something?
- 4 Joysticks
- 4 player start button
- 24 push-buttons in 6 different colors
- I-PAC4
- Used 17" 4:3 LCD screen
- ATX Power-supply
- SATA to Compact Flash adapter
- 8GB Compact Flash card
- Motherboard with Intel Atom
- 1GB DDR2 Ram
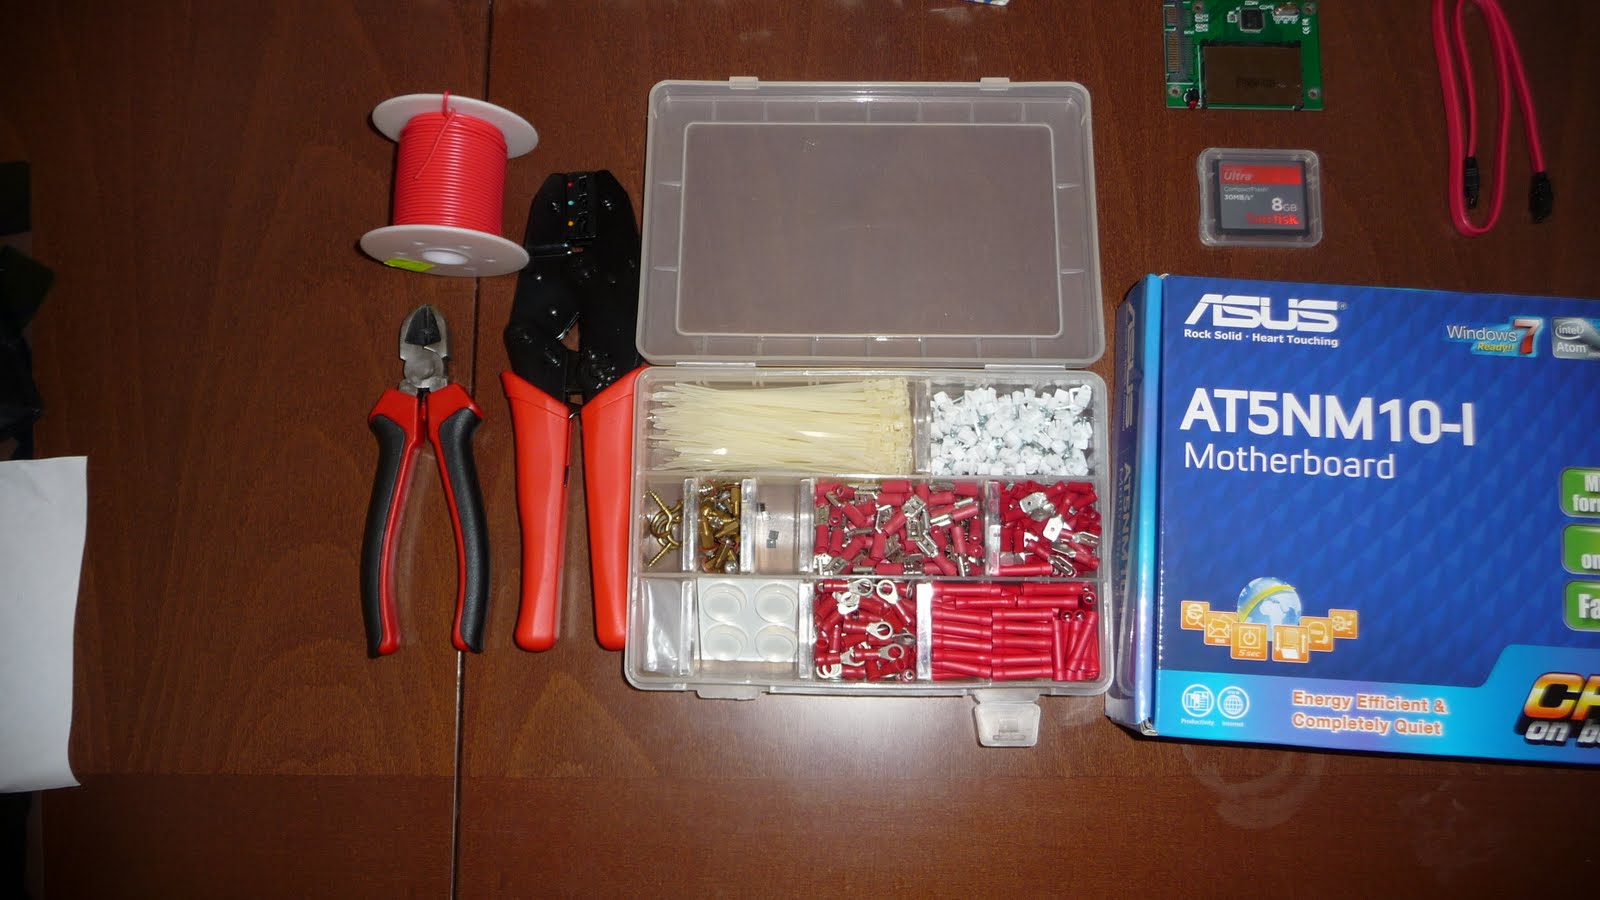
- Crimps
- Crimp tool
- Wires
Seems allot? I missed something, I'll tell you about it later in the post.
The 4 joysticks I bought were colored Blue, Red, Yellow and green. I wanted to build an arcade cabinet for 4 players. Yes I talked to my wife but I didn't tell her how big the machine will be - fatal mistake, this was after I bought the 4 joysticks. Oh well, at least I got enough push-buttons and joysticks for another table ;).
The push-buttons are in 6 colors, White, Green, Yellow, Red, Orange and Blue. I wanted to have a 6 button configuration for each player.
I also bought an I-PAC4.
The push-buttons and I-PAC were bought from Ultimarc. The Joysticks were bought from SUZO-HAPP.
God bless the wide screen age. Looking for a used 17" LCD 4:3 screen was easy enough, and I even found one who's seller is an Electronics guy who fixes Electronic devices for a living, so he gave me the LCD screen for less than 53$ with 3 month warranty.
The power supply is a simple ATX power supply, nothing special here.
Notice that the LCD screen came with an external power supply.
For a hard drive for the machine, I decide to go with a Solid State device. Solid State devices are rather pricey, so I decided to go with a Compact Flash card with a SATA adapter. The Compact Flash is a fast Card is comparison to other forms of flash memory. The SATA adapter was bought from DealExtreme for 9.22$ and the Compact Flash card was bought here in Israel in a local shop for less than 40$.
The motherboard was also bought from a local store. I chose to go with something that will run the Arcade games and not cost too much. I chose to go with a dual core Intel Atom with no special requirement for the graphic card. The graphic card does not provide any added benefit for games running under MAME. The motherboard I chose was ASUS AT5NM10-I. One of the benefits of ASUS motherboards is the "MyLogo" feature which allows the user to customize the bios boot screen. This will come in handy for making and authentic Arcade machine.
Finally, I need wires, crimps etc... to connect all these components somehow together.
These were bought from a local store.
A word on the Software I will be using: After searching the web for many hours, I decide to go with MicroXP. This is a stripped down Windows XP with many features gone from it. I did my initial testing for this OS on a Virtual Machine and it proved itself well.
I later tested it on the hardware I bough and it worked just great. It's fast light and FREE!
Remember I told you I missed something? :) well, I missed a few push-buttons.
I need the following:
- Adding Credits push-button
- Power-On push-button (Illuminated would be nice)
- Exit game push-button
I will probably order them from Ultimarc, but the cost of shipping is rather high. If I don't come up with a good idea, I'll have to settle with the fee :(.
Sunday, August 15, 2010
What I...
Note that the table is not complete and will most likely change
What I do like:
The idea that I will have a table with no visual buttons or joysticks. The table is rather compact and will fit anywhere in the house.
The table is designed for two players one on each side of the table. The idea is to configure the arcade games in coocktail mode.
What I dislike:
The size of the cabinet that will hold all the parts of the arcade is rather big, it's height is 25cm which is half of the table's height. I wish I could make it less, but I don't see how.
The table will probably be heavy, which is a little problem when we want to move it for the kids, especially for my wife, I know she will complain about it.
What I don't know:
I will need some massive wiring in the cabinet, and I need to make sure they won't interfere with the air flow.
I need to find a way to build the table with the ability to open and modify anything inside without having to remove screws.
What I really don't know:
Will someone ever read this blog? Will it help someone? Will it inspire someone to do this venture? I'm not sure, but I know I'm having fun documenting and building this arcade table.
Easy part/Hard part
The items and tools I need are the easy part. The hard part here is to build a table that will pass the approval of my wife. The idea was to replace a table that already exists in the house used as a small coffee table and also as the kid's table for drawing and eating (yes the table has to have a basic "waterproof" ability, otherwise, well you know :)).
I will upload picture of all of the components parts to the blog, hopefully today.
The easy way to go would be to buy a small net-book or something similar to the Zotac MAG HD-ND01 and add to it an LCD screen and your almost done without too much to spend, but where is the fun in that? :).
So I started buying what I need and I will place another post that will list them and have pictures as well. I know that I need to fit everything in something similar to what I have today in my home - a 55cm x 55cm square table with a height of 45cm. The table was bought from IKEA.
To start, I need to make sure I have the correct design of the table, so I downloaded Google Sketchup and started designing the table. I created boxes that represent each component I want to fit in the box and started juggling them around. It was not easy, but I got everything good and packed until I measured the Joystick that I bought and it turns out it's 15cm in height (bottom including micro-switches to the top of the joystick). This caused the table to get modified and, well, it's fine but I'm still not satisfied and need to think it over and see what I can improve.
I'll add the Google sketchup as well for referance. The sketchup is not complete, and I will update it as frequently as possible.